Art Process Overview 2016
By Neil Blevins
Created On: Nov 11th 2013
Modified On: July 30th 2016
You have two choices with this lesson, watch me discuss the issue in
the video below, or read the full text.
Whether you're doing concept art, video games, animated
films, visual effects, etc, we're all doing the same basic thing,
trying to create compelling imagery (unless you're doing motion, but
that
portion won't be taught here).
I've split up my image making process into 20 stages:
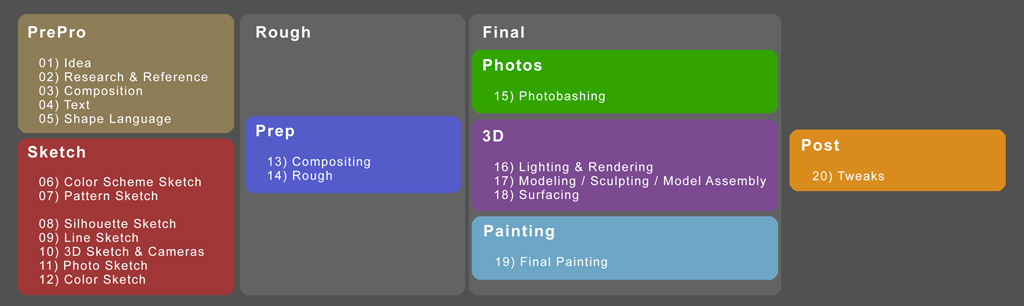
No matter what job you do, you are basically doing some subset of these
stages.
- If you are a Concept Artist
or Matte Painter who likes
incorporating 3d into your workflow, you may do all 20 stages.
- If you are a more traditional 2d Concept
Artist, you may skip stages 15-18, and focus mostly on stage 19.
- If you are a Concept Artist
but like keeping your paintings rough, you may do stages 1 to 14, and
20 only.
- If you are a Modeler in
Feature Animation, you may only do stage 17.
- If you are a Shader / Texture
Artist in Visual Effects, you may only do stage 18.
Some other notes:
- You also may skip stages you don't need for a project, like I've
outlined 5 different types of sketches, I've never made all 5 for a
single project, I usually only do 1 or 2 before moving onto stage
13-14,
the Rough
Painting.
- Also, the reason
these are stages and not steps is because a lot of the time you may do
these stages in a different
order, like you may do a Color Sketch, then realize you need to work on
the silhouette more, and so jump back to that stage to do some more
exploration. So these stages are here to help, not to define a rigid
workflow.
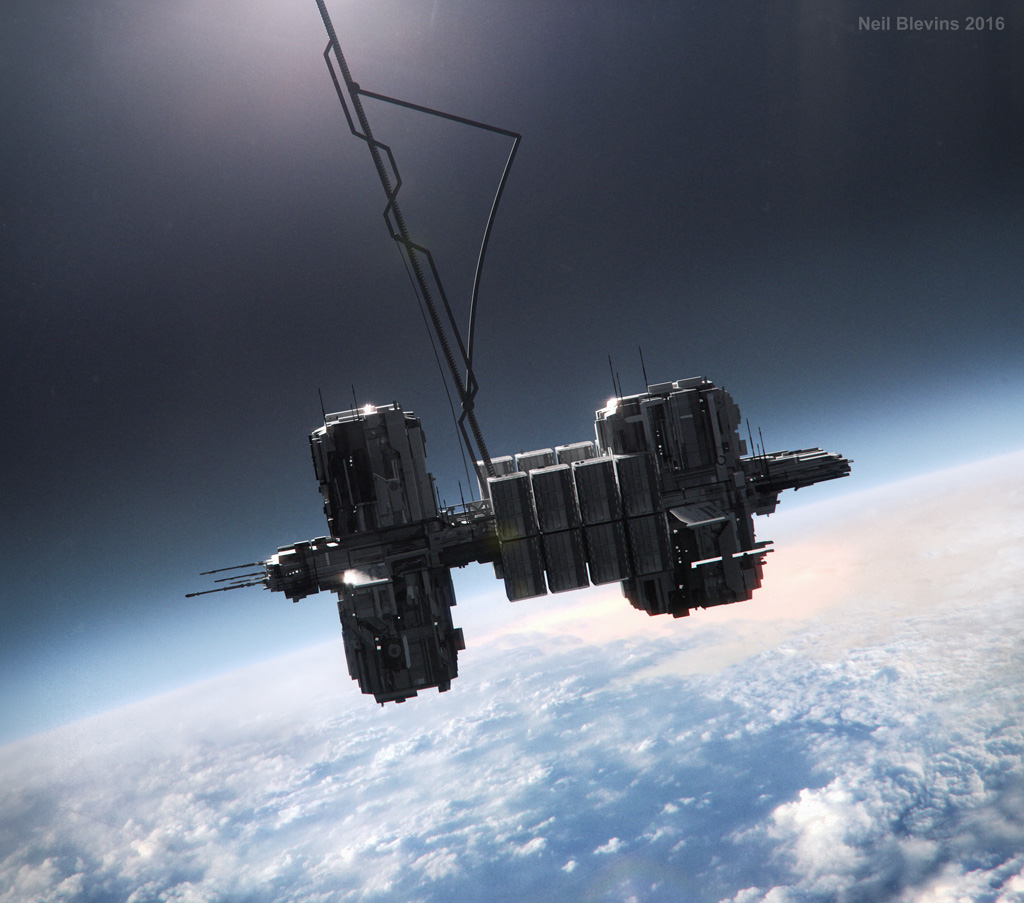
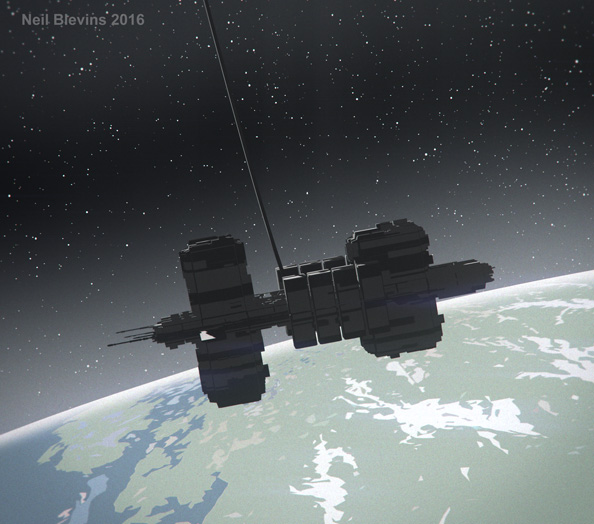
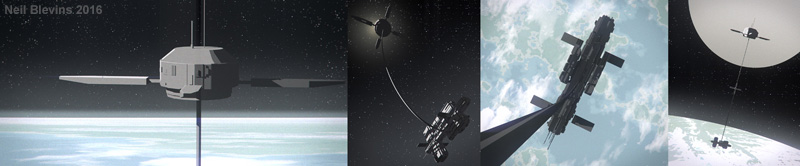
Here's more info on each stage, as an example, I'll be using the
creation process of the image below, one of my Megastructure images,
the skyhook:
1) Idea
The initial idea, this can be anything from "I'm going to make a robot"
to something more specific like "I'm going to make a robot whose
purpose is construction and he'll have really thick arms".
Or in this case, "I want to illustrate a skyhook."
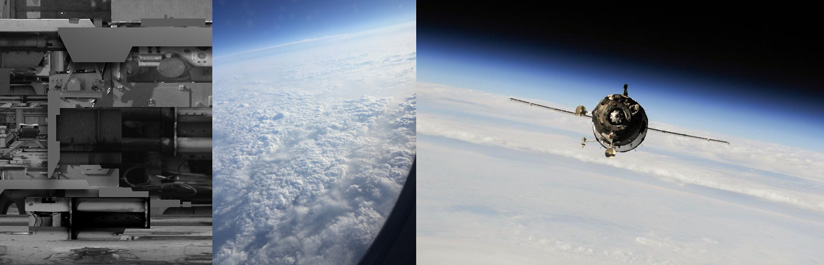
2) Research &
Reference
Get good reference based on the idea. This can be other artists work,
photos of real things, photos of completely unrelated things but that
might help support the initial idea, a photo of a material I want to
use in the image, etc. Getting lots of good reference also helps build
your "mental visual
library".
For this image, I collected Nasa photos of ships in orbit, some of my
own photos of flying in an airplane, and random mechanical photos that
inspire the spaceship machinery.
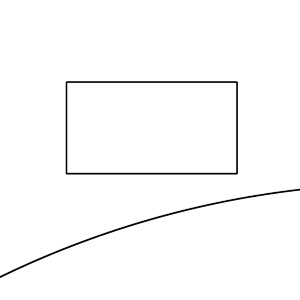
3) Composition
Do some strong thinking on the composition of the image. What format
will the image take? Will the
canvas be long and thin like a film frame, or square because I'm making
a CD
cover? Will the overall composition be circular? Triangular? Do I want
to use the
Golden Spiral? How much detail does the piece need and where will it be
placed?
For this image, I decide to wait till I've done some sketches before I
make any firm decisions on the aspect ratio and overall composition.
But I do know there is likely to be a few elements, the transport ship,
the skyhook itself, and a planet. And as I decided at the shape
language stage, the planet will be round and the ship will be square.
And I think it's likely the image won't be landscape, but instead will
be square or portrait size, since the thing I am illustrating is a long
thin wire.
4) Text
Write down interesting words, they may be useful for image titles, or
for inspiring an idea. Write down description of interesting concepts.
Write a little backstory for your character or scenario.
For this image, I do a bunch of research on skyhooks, and come up with
the following text: "A skyhook is a tether
attached to a heavy orbiting space station that would help reduce the
cost of
placing payloads into space. The cable attached to the station would
extend
towards the surface of the planet. Payloads would be brought to the end
of the
hook by a suborbital launch vehicle, attached to the cable as it
passes, and
then are flung into orbit by the rotation of the cable / station around
its
centre of mass. The station would then be reboosted to its original
altitude by
propulsion, or by deorbiting another object equal in mass to the
payload. A
skyhook is different from a space elevator in that the cable would be
much
shorter, would not come in contact with the surface of the planet, and
the
cable / station would be rotating like a pinwheel around its center
axis."
5) Shape Language
What will the general shape language of your image be? All circles? All
Triangles? Straight Edges? Swooping curves? If the piece is aggressive,
will spiky shapes convey that idea better?
For this image, I decide since the planet is going to be a circle, I'll
make the transport spacecraft more box like, so it contrasts nicely in
shape.
6) Color Scheme
What will be the main colors of your piece? Are there accidental colors
you can add to make your piece more color rich? How do the colors
support the idea?
For this image, I pick some colors off of a nasa picture of a spaceship
in orbit.

7) Shapes And
Patterns
What sorts of shapes will be contained in the image? Take your shape
language decision and draw down some shapes that fit that bill, then
make sure your design is made up of variations of these shapes. Will
you combine shapes into a repeating pattern? Like stripes on an animal?
Paneling on a starcraft?
For this image, I come up with a basic pattern for the greebling on the
spacecraft.
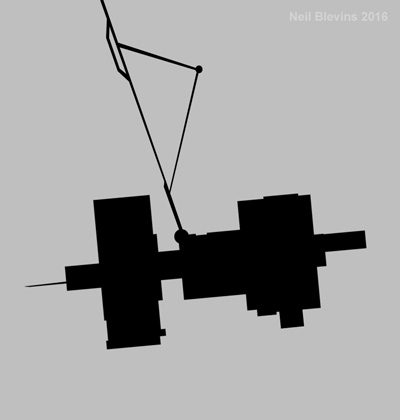
8) Silhouette Sketch (aka Shape Sketch)
Here's the first of our sketches that gets specific with the
composition, the idea with a silhouette sketch is to focus on the
edges of your object, general proportions, don't worry about detail.
Make sure your subject is instantly recognizable, even if all you see
is the silhouette.
For this image, I focus on the silhouette of the Transport ship. With
the decision to go boxy in Stage 4: Shape Language, I try and come up
with a shape that is at least a little different from the "standard"
box spaceships seen in other scifi images. I decide on something like
the letter "H", or a saw horse, with the cargo attached to the side
like a utility belt. I also modify the shape to be a tiny bit like a
fish, which works with the compositional element of the tether to look
like a fish on a hook, which supports the idea of it being a skyhook.
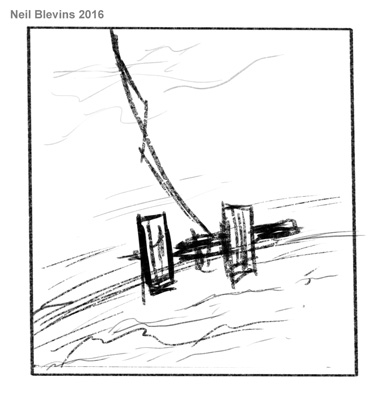
9) Line Sketch (aka Quick Sketch, Line
Drawing,
Initial Sketch, Diagram)
This is a line drawing of your piece. You can use pencil, pen,
digital, whatever. But you're starting to explore the forms from your
silhouette sketch a little further, including adding some simple detail.
For this image, I start combining the ship shape with the planet to
start working on the full composition. Where should the planet be in
relation to the ship, and the teether? I decide on a reasonably square
composition, although a vertical composition would work as well.
Horizontal wouldn't work so well since we want to see the tether and
the ship, and we wouldn't see enough of the teether if the image were
horizontal.
10) 3D Sketch & Cameras
To explore camera and perspective, it may be a good idea to put
together some simple shapes in a 3d program like 3dsmax, maya,
sketchup, etc, loosely following the sketch. The 3d process may suggest
other camera angles you wouldn't have thought of if you stuck in 2d,
also, the final 3d sketch may be useful to paint
over later. You could also make a quick traditional 3d scene or model a
character in clay and then take a few pictures.
For this image, I start by replicating my initial line and silhouette
sketch in 3D, but after that, I move my camera around and take some
other "angles" to see if I like them better.
11) Photo Sketch (aka Photobashing Sketch, Photo Collage)
To avoid that blank canvas effect, try throwing together a sketch using
photos of real things as a basis to paint over (and don't worry, this
is just a sketch, you don't expect much of anything from the original
photos to show up in the final painting, it's just to give you
something textural to start from).
For this image, I take some of the photos I took from one of my recent
airplane rides and place them on the planet, and place some random
achinery photos I've taken over the silhouette of the spaceship.
12) Color Sketch (aka Color Brief, Color Rough, Value
Sketch, Color Preliminary,
Color Thumbnail, Flat Color Sketch)
A quick painting to help place your colors. Don't add details, this is
all about general color placement. Use your Color Scheme Sketch as a
guide, or maybe you'll discover other colors are better.
For this image, I colorized my 3d
sketch and added a few clouds.
13) Compositing (aka Initial Digital Collage, Image Assembly)
I then set up a simple composite for my image in photoshop, this can be
made up of elements of any of your sketches. The reason this can be
referred to as digital collage is because you may in fact use multiple
elements, hand painted things, photos, 3d, all mixed together to arrive
at your final result.
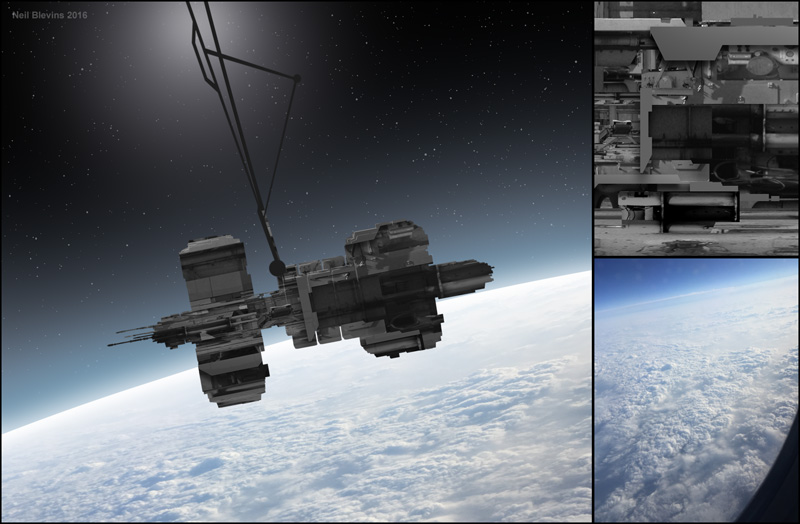
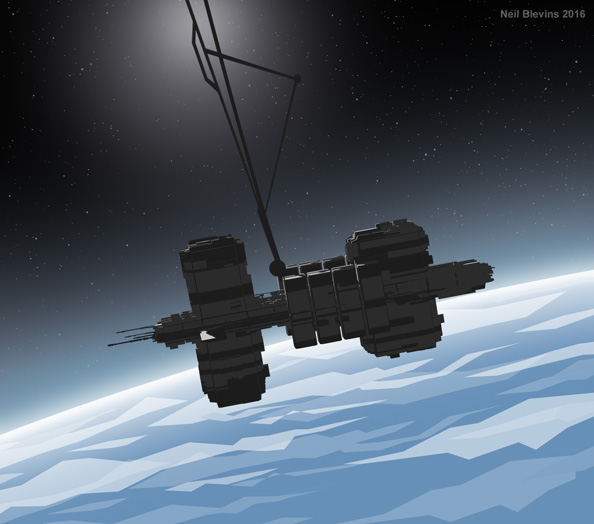
For this image, I setup my basic comp with groups. My lowest group is
my space layers, then I place a planet group, a group of mist above the
planet, then a group of the spaceship, then various effects layers. I
also plan on doing my final compositing in Red Giant's Magic Bullet
Looks software, so I setup a basic comp in that software as well.
14) Rough (aka Rough Digital Collage, Rough Painting)
In the composite I start a rough painting to flush out the details from
my sketches. This may be the last step if I don't want to do a more
finished image.
For this image, I didn't do a rough, since my earlier sketches were
pretty detailed, I decided to go straight for the final.
15) Photobashing
If I'm going to move onto a more finished piece, I use bits of
photographs to speed up the process.
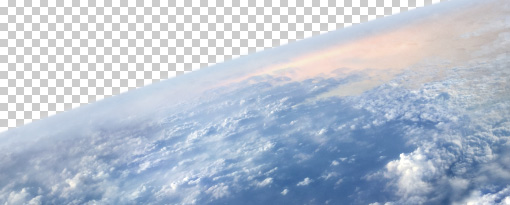
In this image, the main photo element was the clouds on the planet. I
used 5 photographs that I took from an airplane ride, and blended them
together to form the final planet cloud layer.
16) Lighting & Rendering
I take my 3d sketch
and refine the lighting in 3d, using my Rough and/or Color
Sketch as a guide.
In this image, lighting is pretty simple, a kicker light from the top
back to get a bright silhouette from behind the ship. And a glow from
the planet below spilling soft blue light onto the ship (the dome light
at the bottom).
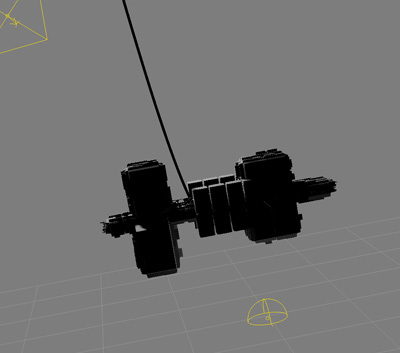
17) Modeling / Sculpting / Model Assembly
I then do my final modeling in 3d. Any part of my scene that will be
3d, I replace the rough 2d layers in my composite with the 3d elements.
Modeling generally refers to hard
surface modeling. Sculpting generally refers to organic sculpting maybe
using a sculpt program like mudbox or zbrush. And Model Assembly means
taking the individual modeled / sculpted pieces and sticking them
together in a pleasing final model (like placing a hundred plants in
your terrain for example).
In this image, I added more detail to the spaceship using standard hard
surface modeling techniques in 3dsmax.
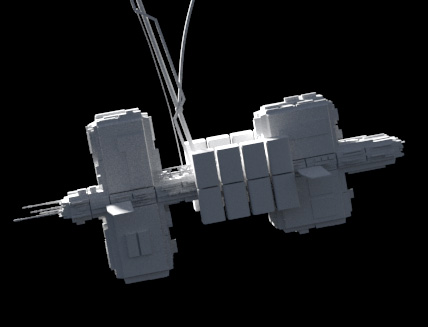
18) Surfacing (aka Shading &
Texturing)
Adding the final shading and textures to my 3d model. This may be
simple, as I will probably paint on top of my final image. Or it could
be complex if I plan on keeping it mostly 3d.
In this image, I add most of the ship detail with textures.
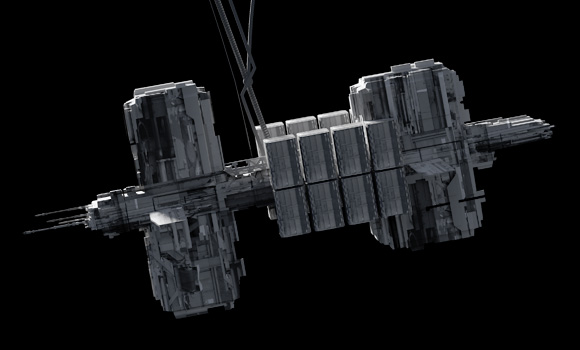
19) Final Painting (aka Final Digital
Collage)
I then take my composite, add the 3d elements that I modeled, lit and
shaded, mix with any photo elements, and then paint on top in 2d. This
painting is far more refined than
the rough, but I use the rough as a guide, and some
elements from the rough may even make their way into the
final painting. I use lots of modern matte painting techniques to
meld the 3d, photos and traditional 2d paint together. The
idea is some things are just way easier to paint in 2d then to do in
3d, some things are easier to photograph and the manipulate than to
build, so why not use the best of all worlds.
In this image, here's the hand painting I did on the ship overtop of
the 3d model / texturing. It was mostly adding little details and
enchancing the textured greeble patterns.
20) Tweaks
So you think you're done? Lets do one last check. The final tweaks to
all the elements. Really push the Composition,
Color, Form and Texture. Put the image away for a few days to see it
with fresh eyes. Mirror the canvas to see if you've missed something.
Compare it to your own work or the work of others to make sure it holds
up. Ask someone for
their opinion. Look at the image on a different computer or platform to
see what small tweaks need to be made (I like looking at it on my
iphone to see it in a very different way).
Conclusion
So now you have a little more information on
the 20 stages I use for my image making process. Obviously this is just
a short overview of the process, each stage could easily warrant a full
book on the subject. But that's a lot of writing, and you'd have to
wait decades for it to get done since I do all of this stuff in my
spare time. And a book is also something that's difficult to constantly
revise and update, since I'm always learning new things that I want to
share with your guys. So what I've decided to do is this: My CG
Education page is divided into these 20 stages, and under each stage is
a series of tutorials (both text and video) that relate to that stage.
And I'll update the page as I go. That way I can share the information
as I have time to write or record it, rather than waiting for the
entire stage to be fully fleshed out.
So if you're interested in following along with all 20 stages, you can
read all the articles, or if you're more of a specialist, say a texture
artist, then you can read just the tutorials in the Shading and
Texturing stage. I tried to make the material on the CG Education page
as useful as possible to the widest audience possible, from specialists
to generalists, concept
artists, matte painters, modelers,
shading / texturing artists, etc, and whether you're doing vfx,
animated films
or videogames or something else entirely.
So there you go, go explore my
CG
Education Page, and hope you find something in there that's useful
in your own work.