Converting A Mudbox Model
To
3DSMax
By Neil Blevins
Created On: Sept 21st 2009
Updated On: Sept 28th 2013
Software: 3dsmax, Mudbox
Here's a tutorial on how to transfer a model from max to mudbox,
export a mesh and a displacement map, and then render it in max using a
bunch of different displacement methods (depending on what renderer you
want to use). I'll be using 3dsmax 2009 and mudbox 2010, but
the
process is quite similar for any recent version of max and mudbox.
Making the Mesh in Max, and
Exporting as Obj
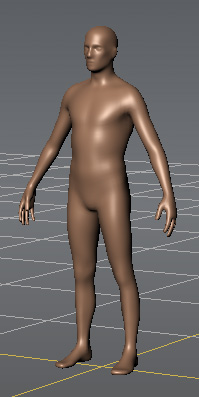
- Make Your Mesh in max.
Just for testing purposes I
created a simple sphere with a radius of 45 and 32 segments. A few
notes on your mesh, ideally, your mesh should be mostly if not
all quads, and the more square each individual face is, the better your
mesh will displace. So try and avoid as much as possible long thin
faces.
- Make sure the "Generate Mapping
Coords" is on. Or if you have a more complex object, create good
uvs for the object using the UVW Map modifier and/or the Unwrap UVW
modifier.
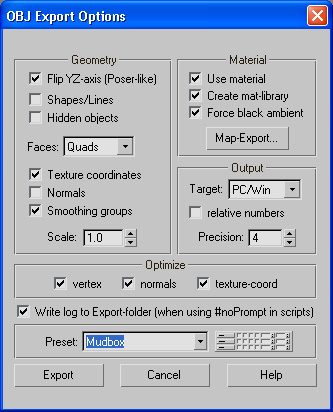
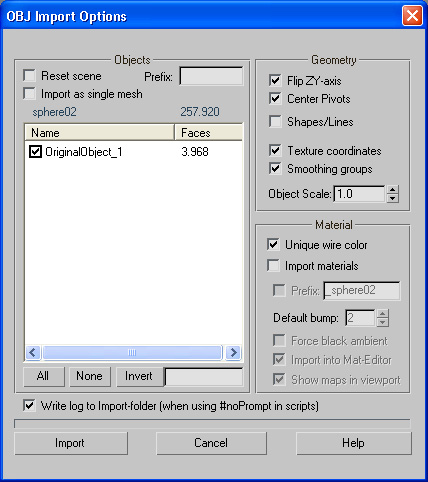
- Export Selected, choose
obj, use the mudbox preset...
Importing and
Displacing in Mudbox
- Open Mudbox
- File -> Import,
choose your obj file.
- Subdivide Selection 4
times. (Shift-D)
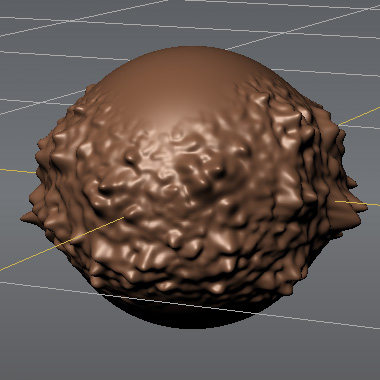
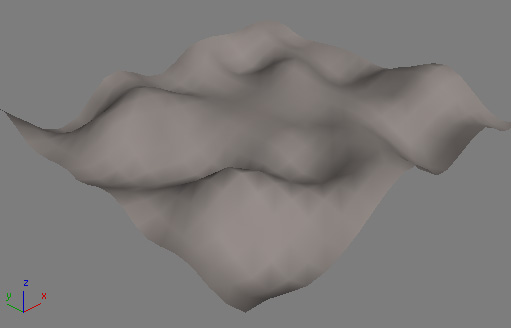
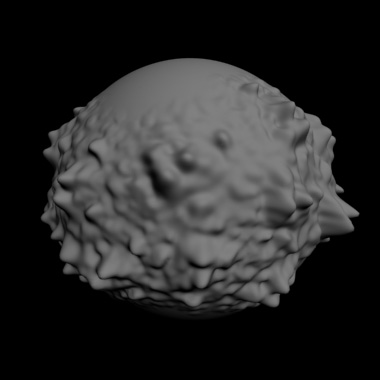
- Displace your mesh using
various brushes
Creating A Displacement Map
Your next task is creating a displacement map, which
serves as the difference between your Level 1 and Level 4 mesh. You may ask, why are we using a level 1
mesh, and not the
original level 0 mesh? In general, I have found using the level 0 mesh
doesn't give you enough mesh detail to allow the displacement map to do
its job. The more detail in the actual mesh, the less detail your
displacement map has to provide, and the better the final result.
However, the more detail in the actual mesh means higher polygon counts
in your 3d app's viewport, so there's a balance to be struck here. You
don't want to export a level 6 mesh if your final mesh is a level 7,
that will probably be way too many polygons to navigate properly in the
3d app, even though the final rendered result will look almost
identical to the one in mudbox. So I generally export the low poly mesh
at either a level 1 or 2, in an attempt to add more mesh detail without
going too far.
Avoiding UV Smoothing
Artifacts
While creating the displacement map CAN be done in mudbox, a
word of warning. The way max and
mudbox smooth their UVs
is very different from
each other by default. Mudbox defaults to linear UVs, and max's
meshsmooth and turbosmooth modifiers default to partially smoothed uvs.
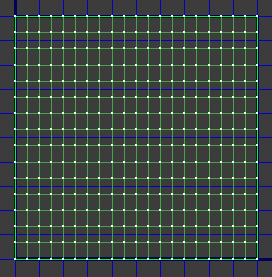
So if
you have a lot of seams in
your UVs or the UVs aren't lined up in a simple grid (like in the
example below), you will see a lot of ugly artifacts in your
displacement
map unless you use max to
extract the displacement map, or unless you modify max's uvs to use
linear interpolation.
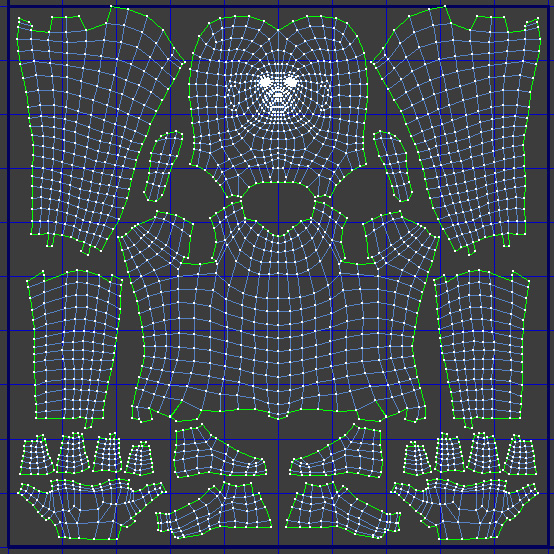
If your object
doesn't have any UV seams and the UVs are nicely lined up (like in our
example below), you will have no smoothing artifacts, no matter how you
make your displacement map.
So I will show you two methods to
make your displacement map, 1)
Creating A Displacement
Map in Mudbox, and 2) Creating A Displacement
Map in Max. If you choose to make your disp map in mudbox, you either
have to use the max linear uv trick I will show you below, or you have
to have a simple uv case like the grid above. Or you can choose to make
your displacement map inside max, and that works for all cases
automatically, but it's a more complex process. Feel free to choose
whichever technique you want to use on a case by case basis.
Creating A Displacement
Map in Mudbox
- Select the Object in Object List
- Step
Level Down three times (go to the
Level
1 Subdivision Level)
- Mesh
-> Recreate Level UV's. This is a
very important step, so don't miss it. Mudbox does not automatically
generate uvs for every subdivision level to save on memory.
- File
-> Export Selection, save
as obj, call it Level1.obj.
- Maps
-> Extract Texture Maps
-> New
Operation. See the dialog below.
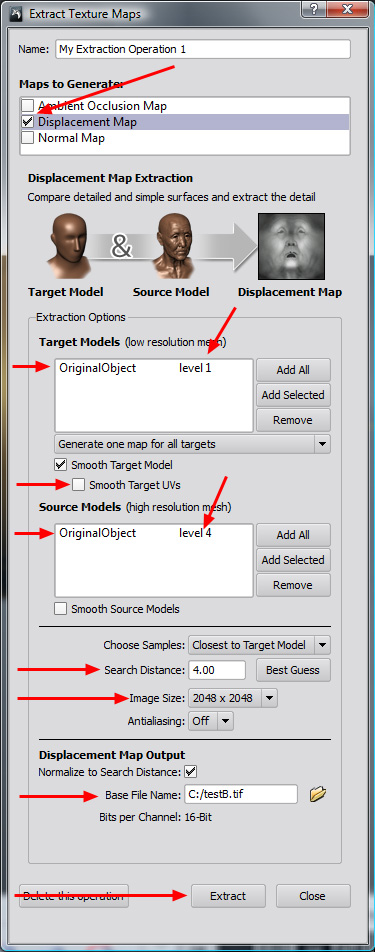
Instructions:
- Choose
Displacement Map.
- Select
your model in the Object List, hit "Use
Selected" in the Target Models section. Click on the text marked
"level 0" and turn it into "level 1".
- Turn
"Smooth Target UV's" off.
- Hit "Add
Selected" in the Source Model
section, make sure it's using level 4.
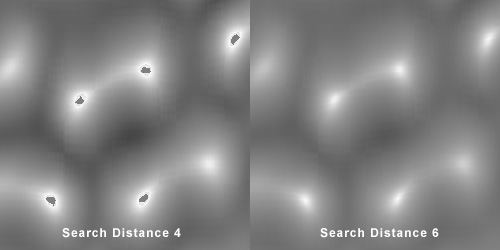
- Search Distance. This should be the same as the highest value
you've displaced your mesh (The "Best Guess" that mudbox picks is
generally
a good starting place). Setting this right mostly involves trial and
error, you'll want
this number to be as low as possible, but not so low that you miss the
peaks of your displacement. Basically the highest and lowest points of
your displacement get missed
with a search distance that's too small, so you'll see neutral grey
dots at your peaks and valleys (see the image below). I generally start
small, render some test
displacement maps, and I keep increasing it until the artifacts go
away.
- Write down this Search Distance, you'll need it for your
displacement in max. In this example, I used a Search Distance of 4.00.
- The size of your bitmap. The higher the better, although the
higher the more memory the map takes. 1 to 4k is a good value depending
on how close you're getting to the mesh, and how much tiny detail
you've added.
- Click the folder icon, and choose a name and filetype for your
displacement map. I use primarily 16-bit Tiffs. You can choose 8bit,
but personally I advise against it, since it's likely 8bit displacement
will produce artifacts in your disp map. A higher color depth means a
smoother displacement map (since it has more values of grey), and hence
a better representation of your displacement, which is why I chose
16bit. Note: If you choose a 32bit floating point image, export to a
32-Bit FP Tiff. Do not export to a 32-Bit FP Black and White Tiff, as
this format is not supported by max.
- Hit Extract
Creating A Displacement
Map in Max
- Select the Object in Object List
- Step
Level Down three times (go to the
Level
1 Subdivision Level)
- Mesh
-> Recreate Level UV's. This is a
very important step, so don't miss it. Mudbox does not automatically
generate uvs for every subdivision level to save on memory.
- File
-> Export Selection, save
as obj, call it Level1.obj.
- Step
Level Up three times (go to the
Level 4 Subdivision Level)
- File
-> Export Selection, save
as obj, call it Level4.obj.
Now lets go into max.
- Open max. Make sure your default renderer is set to the scanline
renderer (although feel free to experiment with mentalray if you'd
like).
- File -> Import, load the TWO obj
files you created into max.
- Select the Level 1 Mesh. Remember,
this mesh needs to have uvs to do all the following steps.
- Apply a Turbosmooth Modifier
(Turbosmooth takes up way less memory than Meshsmooth, so for high
subdivision models, using turbosmooth is a must to conserve memory),
set to Render Iterations 3. 3 is the number of iterations between you
level 1
mesh and your level 4 displacement map. So if you subdivided your
mudbox object to level 6, and exported a level 2 obj file from mudbox,
you'd want to set this value to 4.
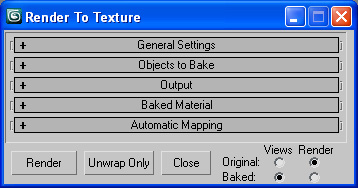
- Click
On Rendering -> Render To Texture
(Make sure your Level 1 mesh is still selected)
This dialog has many sections. I'll
show you what to do for each section.
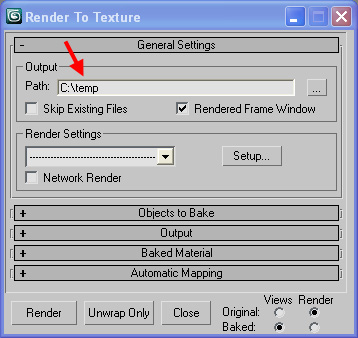
- Under
"General Settings", set your Output
Path for your displacement map.
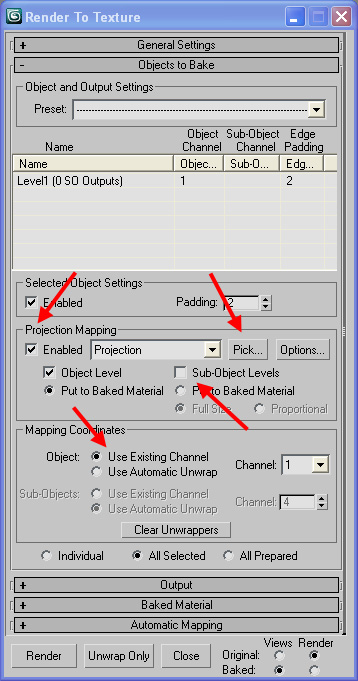
- In
"Objects To Bake", Under "Projection Mapping", choose Pick, and select your Level 4 mesh.
- Click
the Enabled checkbox beside
the Projection.
- Uncheck
Sub-Object Levels.
- Under
Mapping Coordinates, choose Use
Existing Channel, and set the channel to whatever map channel
you want to use, usually Map channel 1, unless your object has more
than 1 uv set (if the Channels dropdown has no numbers in it, that
means you forgot to put uvs on your lowres mesh.)
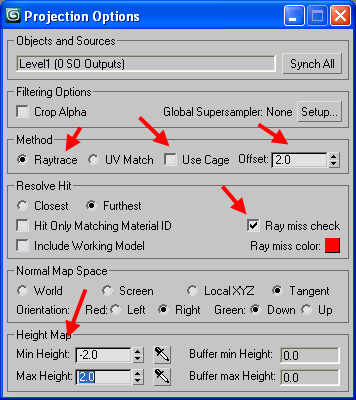
- Under
"Projection Mapping", choose Options.
- Method
should be Raytrace.
- Uncheck
Use Cage, and start with a
low Offset, say 2.0
- Make
sure Ray Miss Check is on.
- Change
Height Map, Min and Max Height
to -2 and 2.
- Close
the Options Dialog
- In
"Output" hit the Add Button,
add a HeightMap.
- Under
Filename and Type, save a tif file.
I change the settings for the tif to 16-bit Color. But if you
don't
have too much detail, 8-bit may be ok. A higher color depth means a
smoother displacement map (since it has more values of grey), and hence
a better representation of your displacement, which is why I chose
16-bit. Note: I don't believe it's possible to save a 32bit floating
point tif from max. If you want 32-bit, try an exr.
- Choose the size of your bitmap.
The higher the better, although the
higher the more memory the map takes. 1 to 4k is a good value depending
on how close you're getting to the mesh, and how much tiny detail
you've added.
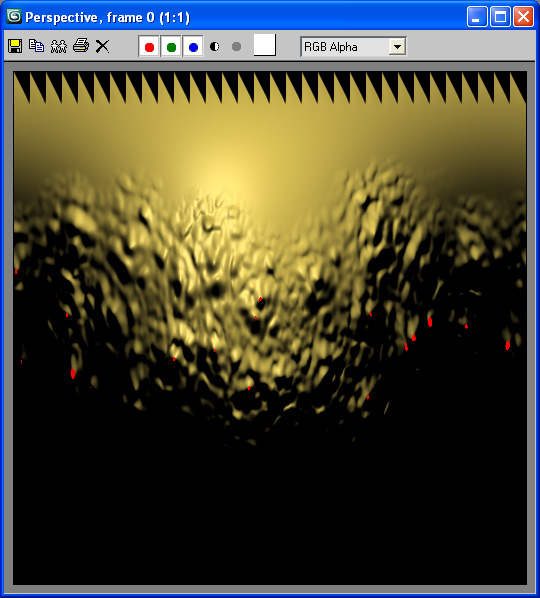
- Hit
Render

- You should see a bitmap that looks sorta like this. Notice the
red blotches. This is telling you that your offset and min and max
heights are too low. Ideally the min and max values should be the same
height as the highest value in your displaced mesh, but figuring out
this value can take some trial and error. You could pick really high
numbers, which will guarantee no red blotches, but doing so will
produce less detail in your displacement map. So I usually start low,
and keep raising it till the red blotches go away on my render.
- Go back into "Projection
Mapping", choose Options.
Change the Offset to 4.0, the Min
Height to -4.0 and
the Max Height to 4.0.
- Hit Render again. This time your red
splotches are gone.

Make sure to write down your min and max height values. And thanks to
Eric Craft for some help with this technique.
Importing Back into Max
- Start a fresh scene of max.
- Import the obj file of
level 1 that you created in mudbox into max.
Rendering
using the Scanline and Displace Modifier
- Apply a Material that
has a diffuse color of 128,128,128 (mid
gray)
- Now if you used Mudbox to create your displacement map, you need
to place a Unwrap UVW modifier on your
object, then Edit the uvs, select all of them, and in the Uv Editor
choose Tools -> "Break". That will ensure Linear UVs. If you used
Max to create your displacement map, YOU DO NOT NEED TO DO THIS STEP.
- Apply a Turbosmooth Modifier
(Turbosmooth takes up way less memory than Meshsmooth, so for high
subdivision models, using turbosmooth is a must to conserve memory),
set Render Iters to 3. 3 is the number of iterations between you level
1
mesh and your level 4 displacement map. So if you subdivided your
mudbox object to level 6, and exported a level 2 obj file from mudbox,
you'd want to set this value to 4.
- Apply Displace Modifier
to the object.
- When using an 8bit or 16bit image, in the Displace Modifier, set
the Strength value. So if you
extracted your disp map in mudbox, and your search distance was 4.0,
then set the strength to twice that number, or 8.0.
Or if you extracted in max, it's
the difference between your Min and
Max Height, in this case those were -4.0 to 4.0, so set
the strength to 8.0. If you
chose a 32-Bit floating point image, then leave this value at 1.
- When using an 8bit or 16bit image, click on Luminance Center,
make sure center is at 0.5. If you chose a 32-Bit floating point image,
then leave
this unchecked.
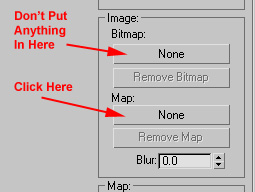
- Click on "Use Existing Mapping".
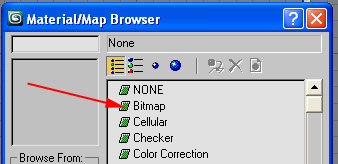
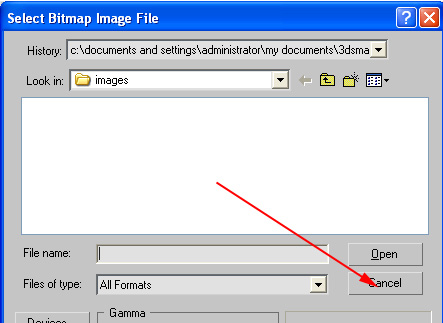
- In the Image area of the Displace Modifier, under Map,
click the button that says "None" (Do not put anything in the Bitmap
part of the Displace Modifier). In the Material/Map Browser that comes
up, choose a Bitmap Map,then hit cancel without selecting your bitmap
from the
file dialog.
- Open an instance of the map inside the material editor, and set
the Filtering to None. When
your displacement map was originally calculated, it goes through a
filtering process to achieve the final result. Then when the geometry
gets displaced in max, that geometry gets filtered as part of the
standard renderer antialiasing process. If you turn on the image
filtering as well, you're basically filtering the bitmap a 3rd time,
which may make your final result blurrier than the result inside
mudbox. But in
some cases, especially if you have a lot of high contrast detail, you
can play with turning this setting to "Pyramidal" or "Summed Area" and
see if it helps remove any artifacts. But I've had more luck keeping it
off. Note, if you chose a 32-bit floating point image, not turning
Filtering to
None will usually result in an out of memory error. So make sure to
turn this to None before selecting your displacement map.
- In the bitmap, select your Displacement
Map that you created.
- Render in Scanline
Rendering
using Vray
- Under Render, Assign Renderer, Production, choose Vray 2.40.
- Now if you used Mudbox to create your displacement map, you need
to place a Unwrap UVW modifier on your
object, then Edit the uvs, select all of them, and in the Uv Editor
choose Tools -> "Break". That will ensure Linear UVs. If you used
Max to create your displacement map, YOU DO NOT NEED TO DO THIS STEP.
- Optional Step: Apply a Turbosmooth
Modifier
and set Render Iters to 1. The higher this number, the more accurate
your results with vray will be (ie, how close your vray disp
will be exactly like your mudbox model). But also, the higher the
polygon count. Do not set Render Iters above the difference between the
iterations between you level 1
mesh and your level 4 displacement map, in this case, don't set it
above 3. As another example, if you subdivided your
mudbox object to level 6, and exported a level 2 obj file from mudbox,
don't set the turbosmooth modifier any higher than iterations of 4.
- Set Vray as your
renderer.
- Create a Vray Material,
assign it to your object.
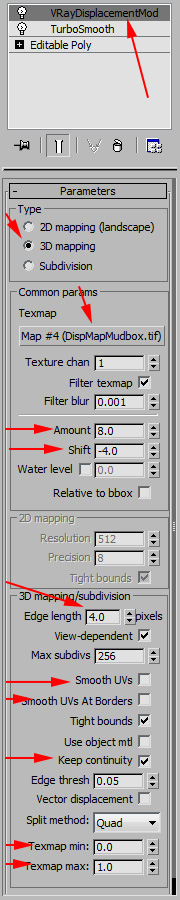
- Add a VrayDisplacementMod
modifier to your object.
- Check 3D mapping.
- Click the "None" button and choose your Bitmap.
- When using an 8bit or 16bit image, set the modifier's Amount Value.
So if you extracted your disp map in mudbox, and your search distance
was 4.0, then set the strength to twice that number, or 8.0.
Or if you extracted in max, it's
the difference between your Min and
Max Height, in this case those were -4.0 to 4.0, so set
the strength to 8.0. If you
chose a 32-Bit floating point image, then leave this value at 1.
- When using an 8bit or 16bit image, set Shift to -4 (this sets a value of grey to be no
displacement). If you chose a 32-Bit floating point image, then leave
this value at
0.
- Make sure Edge Length is
set to a
value of 4.0 and reduce if you need
higher quality (but rendertimes will also go up).
- Uncheck Smooth UVs and Smooth UVs At Borders.
- Check Keep Continuity.
- Set Texmap min and max
to numbers that are larger than the pixel values in your displacement
map. Start with values of 0 and 1, if you notice any clipping
artifacts, try increasing the max and/or decreasing the min.
- Open the Render Panel, go into the Vray Tab, and open the Global Switches rollout. Make sure
that the checkbox next to Displacement is checked.
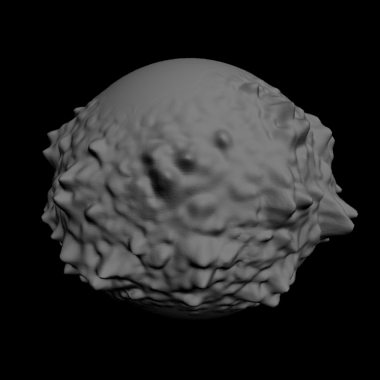
- Render
Note: I found a really great tutorial similar to this one called Akin
Bilgic's Accurate
Displacement Workflow, which also contains info on vray for maya
and zbrush, well worth checking out.
This site is ©2026 by Neil Blevins, All rights
are reserved.
To see hundreds of other tutorials similar to this one, visit the
Neil Blevins Education Site