
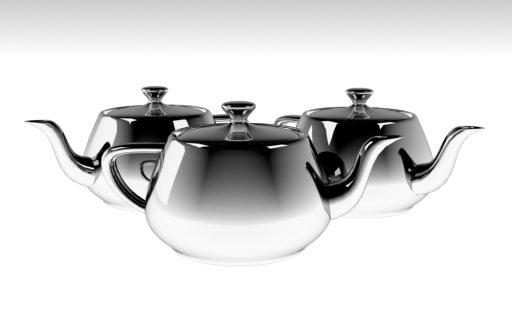
Here's a tutorial on how to create a chrome material in a number of different ways for 3dsmax, although the theory will work for any 3d app or renderer.
I highly recommend reading my Reflections And Highlights tutorial first, as it will discuss what a diffuse reflection is, a specular reflection is, how a specular reflection and a "reflection" relate to each other, etc.

The basic ingredients are as follows:
The material is a Raytrace Material. Set
the diffuse
to Black. Add a falloff map to the reflect slot, set to fresnel, check
the Override Material IOR checkbox, give it an IOR of 20. Turn off
specular highlight if
you want to use real raytraced reflections only and not light the scene
with specular lights.
The first material in the file is a Brazil Advanced Material. Set
the diffuse
to Black. Add a falloff map to the reflect slot, set to fresnel, check
the Override Material IOR checkbox, give it an IOR of 20. Turn off
specular highlight if
you want to use real raytraced reflections only and not light the scene
with specular lights.
The second uses the Brazil Chrome Material. These materials are
quite similar. The Chrome Material automatically has no diffuse, turn
the reflections on, note that
there's no IOR control, this material will be 100% reflective. While an
IOR of 20 is ALMOST perfectly reflective, it's not completely, and so
you'll notice a little of the black diffuse color peaking through on
the Brazil Advanced Material. This material has none of that. Turn off
specular highlight if
you want to use real raytraced reflections only and not light the scene
with specular lights. Note: the advantage of using the chrome material
is that it's more optimized than the Advanced material (since it's been
specifically written only for chrome), so it'll render faster. The
disadvantage is that if you want to add a little diffuse back to your
material, you can't, hence I would generally recommend using the
Advanced Material since it's more flexible, but the choice is yours.
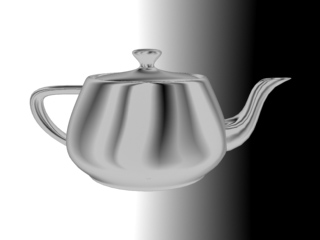
3dsmax's Arch & Design Material in mentalray Renderer
Here's an example file to make a scene like the image above using 3dsmax's mentalray Renderer: polished_raytraced_chrome_mr.zip (Requires 3dsmax 2009 or later, mentalray)
Create an Arch & Design Material. Set Diffuse Level to 0.0. Set
the Reflectivity to 1.0. Check "Metal material". Turn the Diffuse Color
to white (this is because the Metal material checkbox multiplies the
color of your reflections with your diffuse color.) Set IOR in the
Refraction section to 20.0. Under the BRDF dropdown, set the
radiobutton to "By IOR (fresnel reflections)".
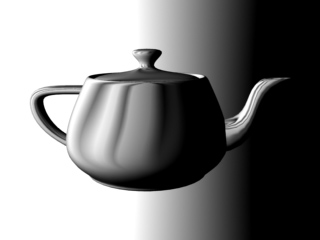
3dsmax's VrayMtl
Material in Vray Renderer
Here's an example file to make a scene like the image above using
3dsmax's Vray Renderer: polished_raytraced_chrome_vray.zip
(Requires 3dsmax 2014 or later, Vray 2.4, ColorCorrect)
This uses a VrayMtl Material, the diffuse is black, the reflect color is set to white. Fresnel Reflections on, Fresnel IOR is set to 20. (note, the env is wrapped in a ColorCorrect map to set the gamma correctly, since this scene uses Linear Workflow)
The Relationship Between
Diffuse Reflection and Specular Reflection
In any real surface, the diffuse component and the specular component when added together must be equal to a ratio of 1. This is the law of Energy Conservation. For more info on Energy Conservation, please read Energy Conservation In Shaders. So if your specular is at a value of 1, or pure white, your diffuse should be a value of 0, or pure black, so together they equal 1, or reflect back as much light as it receives. In cg we can cheat this, however, the more we cheat it the less real the surface is likely to look. So in metals, since they have a strong specular reflection, you must compensate that by reducing the diffuse. That's why in the above examples the diffuse is always black or close to black, the more specular reflection, the less diffuse.
Don't Use The 3DStudio Max
Metal
Material
Here's some tips about doing faked or environment mapped chrome in max. First off, a lot of max people think that to get good metal all you need is the metal shader inside the 3dsmax Standard Material. Seems logical, it is called Metal afterall. However, I highly recommend not using the metal shader EVER, due to the complete lack of control it gives you over the look of your material.
The problem is that with the max metal shader, if you increase the
specular highlight, it automatically reduces the diffuse amount. But
wait, isn't that what we want? Well yes, we do want a material with a
strong highlight and almost no diffuse, but the problem is the
"automatically" part. The metal shader in max is a vast
over-simplification of a
shader known as Cook-Torrance. Such a simplification, that it takes too
much control from the user's hands. As an
artist, we need
to be able to control that diffuse amount so that a material can look
the way we want it to under many lighting conditions.
The problem manifests itself like this. You make a metal shader, increase the highlight, think it looks all good, but then when you place it in your scene, you can place a light an inch from your model, crank its multiplier to like 1000, and still only see the highlight and no actual object (see the example below). Well, to make this look nice, we'll need to add a slight amount of diffuse in. But wait, adding diffuse means the specular will automatically get less. But I don't want that! Well too bad, you used the metal shader! One quick fix solution is to have two lights for every light in your scene, a specular only light and a diffuse only light. But that adds unneeded complexity, not to mention slower rendering.
The solution is
to throw
away the metal shader, and use blinn for your metal materials, and
manually follow the energy conservation laws. Here's
how to make the conversion. Here's the max file that made the
images below, max5: no_metal_shader.zip
Open the file and follow along with the instructions below.
Slot 1 is a max metal shader (such as the one on the left in the image
below). If you grab the diffuse
color swatch of the metal shader, and bring its luminance value up and
down. Notice how the
highlight grows and shrinks. Do the same with the ambient swatch.
Notice
the slight change in overall color. So basically, the diffuse color is
now the highlight control, the ambient color controls anything that is
not highlight, and you no longer have any control over the diffuse. So
your material might look fine in your default lighting setup when you
make
the model, but in complex scene lighting situations, you'll waste
countless
time trying to tweak that lighting. So lets change it over to Blinn.
Copy
your material to the next slot. Change the second material's shader
type to Blinn. Notice the changes, the highlight looks smaller, and the
diffuse got brighter.
So the second material no longer looks like metal, but now you have full control over both the diffuse and the highlight again. The first thing to try is to get back to something that looks like our metal shader using the Blinn controls. Reduce the glossiness to 50, and bring specular level to 250. Take at look at your highlights, they're now about equal. Now bring your diffuse color to RGB 35, 35, 35. Notice the two materials look very similar now. The difference being if I now want to add some diffuse back into the material (or remove it) once I start lighting, I can.
So in general, to make a blinn material look like a metal material,
make the diffuse color close to black, push your specular level to
200-300
(for a large intensity), changing your glossiness changes the size of
the
highlight.
More modern materials like the Brazil Advanced Material in Brazil,
or the VrayMtl Material in Vray, they have an automatic
feature that will decrease the diffuse as you increase the reflection
amount. First off, this is based on much better math than the metal
shader, so it's not a bad idea to use it. But if you really want the
extra control, there are ways around the automatic control. For
example, in the Brazil Advanced Material, just switch the reflection
mode from "Blend" to
"Additive", now you can adjust the reflection amount separate from the
diffuse amount. Just remember to try and keep that diffuse to specular
balance we discussed before, or the material will look fake.
A final note, a guy named Michael Bailey did write an actual
Cook-Torrance shader for 3dstudio max, available here.
However, it's only available for max 4 and 5, it never got recompiled
for later versions of max. Here's an interface shot...
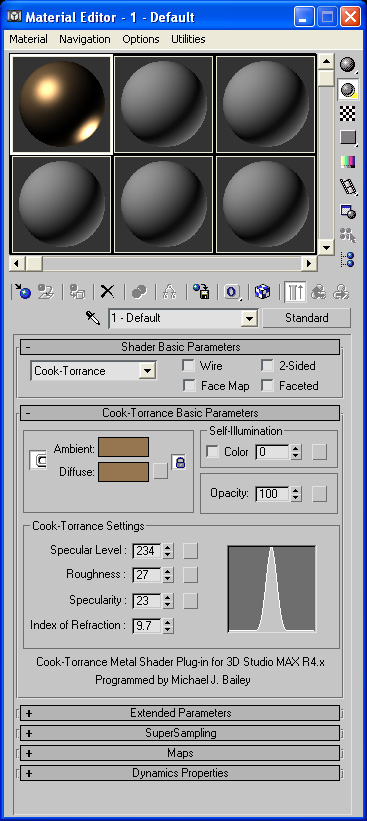
Notice it has a specularity value as well as a specular level. If
you need more diffuse color, you can reduce the specularity and then
increase the specular level or index of refraction to keep a strong
highlight while still retaining some diffuse shading, something the max
metal shader can't do.
Polished Environment Mapped Chrome
The basic ingredients are as follows:


You can also use a standard material to make chrome, however note
that the standard material has
a single reflection slot that holds both the thing the material should
be reflecting (the environment map), and the intensity of the
reflection (based
on the luminance values of your bitmap). The raytraced material
breaks
that up into an environment slot, which controls what to reflect, and a
reflect slot, which only controls how strong the reflection is using
any
black and white map (a colored map in this slot will also tint
reflections,
but that topic is beyond the scope of this lesson). I prefer using the
raytrace material because it gives me 2 slots which means much easier
control over my material, rather than trying to squeeze both functions
into a single map like standard does.
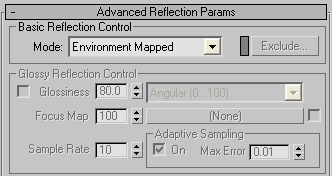
3dsmax's Brazil Advanced Material in Brazil Rio Renderer
The Brazil material settings are almost identical to the raytrace
material settings, the only real difference is how to turn off the
raytrace reflections, just make sure Mode is set to "Environment
Mapped" in the Advanced Reflection Params.
3dsmax's Arch & Design Material in mentalray Renderer
Again, very similar to the Raytrace material example. Place your
environment map in the Environment slot. The Arch & Design material
only requires a single falloff map set to "Shadow/Light", which you can
place in the Reflection Color slot. Lastly, there doesn't seem to be a
way in the Arch & Design material to turn off raytracing for just
one material. So you'll have to turn off raytracing for the entire
scene, which can be found in the Render Dialog, in the Renderer Tab,
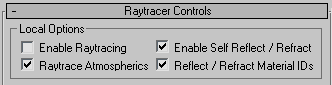
Rendering Algorithms, Raytracing, Enable.
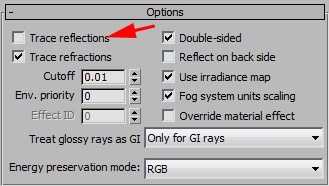
3dsmax's VrayMtl Material in Vray Renderer
Use a VrayMtl Material, the diffuse is black, the reflect color is set to white. Env map in Environment slot. Turn off Trace Reflections. Falloff set to Shadow / Light in Reflect slot. Fresnel Reflections on, Fresnel IOR is set to 20.
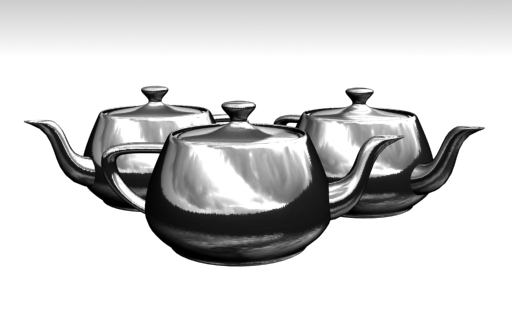
Polished Environment Mapped and Raytraced Chrome
So this would be a combination of raytraced reflections AND an Environment map. Pretty easy to setup, just follow the instructions for the Polished Environment Mapped Chrome, and then don't turn off the raytracing control. That way, your material will do raytraced reflections of any objects in your scene, and for the furthest stuff it'll use your environment map.