9) General
Pattern Placement
Patterns can be
thought of as having three components, how you
place that pattern on your object, how the pattern is stored, and
creating the pattern itself.
These three
components are tied together, but for the purpose of choosing
techniques, lets keep them conceptually separate for the moment.
No one pattern placement method works in all cases, generally a material will need to use several different pattern placement methods. All pattern placement methods can be used for General and Specific Patterns, but for the most part a placement method tends to work best for one or the other. So lets look at the 8 General Pattern Placement methods, and then you can decide which ones work best for the General Patterns in your material:
This is also sometimes refered to as Triplanar mapping. Its like
regular box
mapping, a bitmap is projected from 6 different directions onto a
surface, but the edges
are blended, so you don't see any seams.
Here's a lesson on Blended Box Maps...
Advantages:
This pattern creates a gradient. The gradient depends on the concavity or convexity of an area. You use the resulting gradient to mix between materials or maps. Similar to Ambient Occlusion.
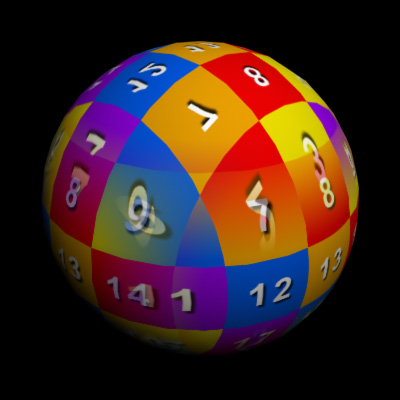
9.1.4) Switcher
A switcher is the simplest of pattern placement. Basically, you define a set of patterns, and they get assigned to specific groups of objects, faces, etc., usually using some sort of ID value that connects the pattern to the thing its being applied to. So for example, you create a rock material that has 5 different rock colors, and then spread randomly the ID 1 to 5 on a bunch of rocks, and each rock receives one of the 5 rock colors.

Here's a lesson on switchers...
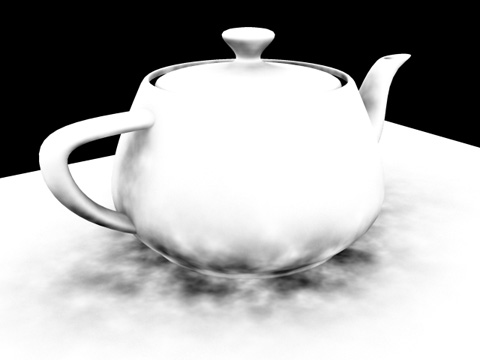
Ambient Occlusion (AO) is a pattern that creates a gradient. The Gradient is based on how much of a particular surface sees of the sky (Or for the more technical minded, its the amount a particular point sees of a hemisphere centered at the point and oriented by the face normal (unless you have a cutoff distance, in which case it's far more likely you'll be simply calculating how close you are to adjacent surfaces)). You then use the resulting gradient to mix between materials or maps.
Here's a lesson on Occlusion...
Examples In Software:
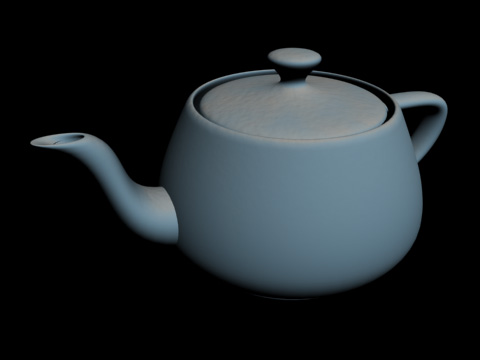
Map that creates a gradient. Areas pointing in a particular direction get one color, areas pointing away get a second color, and a soft transition in between. This can be in camera space (so faces pointing towards the camera get 1 color, faces perpendicular to the camera get another color), or this can be in world space (all faces pointing up in Z get one color, all other faces get the second color.) You use the resulting gradient to mix between materials or maps.
Here's a lesson on direction...
Examples In Software:
Map that creates a gradient. Areas inside a particular reference object is one color, outside is a second color, with controls for a soft transition (object can be Geometric, a special widget, even lighting). You use the resulting gradient to mix between materials or maps.

9.1.8) Distance
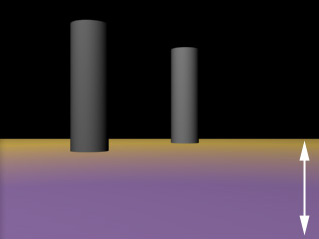
Map that creates a gradient. Areas that are a certain distance from an origin point get one color, areas near a second origin get a second color, and a soft transition in between. Origins can be a point object in space, a coordinate in world space, the distance from a camera, etc. You use the resulting gradient to mix between materials or maps.
Examples In Software:
No one pattern placement method works in all cases, generally a material will need to use several different pattern placement methods. All pattern placement methods can be used for General and Specific Patterns, but for the most part a placement method tends to work best for one or the other. So lets look at the 8 General Pattern Placement methods, and then you can decide which ones work best for the General Patterns in your material:
- Blended Box Mapping
- Curvature
- XYZ Space
- Switcher
- Occlusion
- Direction
- Reference Object
- Distance
Here's a lesson on Blended Box Maps...
Examples In Software:
- 3dsMax Base Package: BlendedBoxMap (max 2017 Ext1 and up, set to
1 or 3 map mode)
- 3dsMax Scripts: SoulburnScripts blendedBoxMapMaker
- 3dsMax Plugins: Vray "VrayTriPlanarTex" map
- 3dsMax Plugins: InstantUV did this, but the plugin was discontinued in 2000.
- Maya Base Package: doesn't exist
- Mari: Triplanar Projection, although once baked into your final bitmap, you can't edit its size, bitmap, etc. in your 3d program. http://www.youtube.com/watch?v=EBsaccegYDc
- Substance Designer: Triplanar Node
- Easy to assign any bitmap to a whole set of objects.
- Since you can use any bitmap, you're not limited by procedural patterns.
Disadvantages:
- Only good for noisy textures, textures with an obvious pattern such as scales or large contrasty dots do not work well because you can see the pattern fade in and out at the edges.
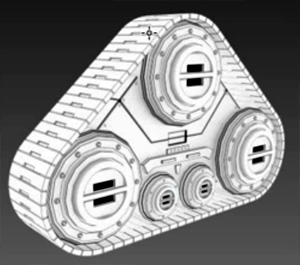
9.1.2) Curvature
This pattern creates a gradient. The gradient depends on the concavity or convexity of an area. You use the resulting gradient to mix between materials or maps. Similar to Ambient Occlusion.
Here's a lesson on Curvature...
Examples In Software:
Examples In Software:
- 3dsMax Base Package: Data Channel (max 2017 Ext1 and up)
- 3dsMax Scripts: Soulburnscript CornerEdgeToVertexMap calculates Curvature then bakes it into your object's Vertex Color Map.
- 3dsMax Plugins: Curve Map http://www.boomerlabs.com/cart/product.php?productid=23&cat=9&page=1
- 3dsMax Plugins:
F-Edge http://www.ddag.org/products.html
- 3dsMax Plugins: Tension Modifier http://www.rpmanager.com/plugins/TensionMod.htm
- 3dsMax Plugins: QuickDirt http://www.cuneytozdas.com/software/3dsmax/
- ZBrush: Bronze Shader
Advantages:
- A real Curvature
map is faster to calculate than Ambient Occlusion
- Captures convex areas that Ambient Occlusion doesn't
Disadvantages:
- The Gradient isn't terribly useful as a pattern directly, has to be enhanced using some other method, like for example using Procedural Noise in XYZ Space.
- Captures edges and concave areas, but doesn't deal with object interpenetration.
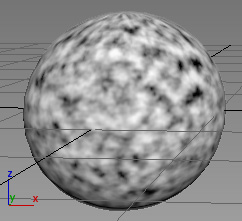
The pattern exists
in a 3 dimensional space. This is generally
used by Procedurals. XYZ Space can be
in world space or object space. For example, if you rotate your object,
the object space changes, but the world
space will not.
Examples In Software:
- 3dsMax Base Package: Most procedurals (Noise, Smoke, Dent, etc.)
- Maya Base Package: Most Procedurals (Cloud, Marble, Stucco, etc.)
- Darktree (Darksim)
Advantages:
- Very quick to assign to your object.
Disadvantages:
- You're limited by the types of available procedural patterns.
A switcher is the simplest of pattern placement. Basically, you define a set of patterns, and they get assigned to specific groups of objects, faces, etc., usually using some sort of ID value that connects the pattern to the thing its being applied to. So for example, you create a rock material that has 5 different rock colors, and then spread randomly the ID 1 to 5 on a bunch of rocks, and each rock receives one of the 5 rock colors.
Here's a lesson on switchers...
- Switchers
For Randomizing Patterns
- Switchers For Specific Patterns On Specific Objects
- Switchers and IDs, Which To Use When
- 3dsMax Base Package: map switcher:
Multi-map in 3dsMax (mentalray only and limited to 20 slots)
- 3dsMax Base Package: material switcher: Sub-object Material
- 3dsMax Plugins: map switcher: MultiIDMap by Grant Adam compatible with other renderers (not mr compatible, limited to 15 slots)
- 3dsMax Plugins: map switcher: VrayMultiSubTex (vray only)
- 3dsMax Plugins: map switcher: VrayHDRI (vray only)
- 3dsMax Plugins: texture map switcher: CG Source's MultiTextureMap
- Maya Base Package: Single Switch, Double Switch, Triple Switch, Quad Switch
Advantages:
- Great for adding
variety to your scene without the need to create almost identical
materials with only one or two small things changed.
Disadvantages:
- The Switcher result isn't terribly useful as a pattern directly, has to be combined with another pattern placement method (like UVs, for example).
- Objects / faces inside max can only have a single Material ID, so
you can't switch multiple parameters independently of each other
without using Mat IDs AND Object IDs. VrayHDRI can use User Defined
Properties, which means any object can have unlimited named IDs, but
it's Vray only and works only with bitmaps.
- In 3dsmax, there isn't a single full featured Switcher map that works in all renderers.
Ambient Occlusion (AO) is a pattern that creates a gradient. The Gradient is based on how much of a particular surface sees of the sky (Or for the more technical minded, its the amount a particular point sees of a hemisphere centered at the point and oriented by the face normal (unless you have a cutoff distance, in which case it's far more likely you'll be simply calculating how close you are to adjacent surfaces)). You then use the resulting gradient to mix between materials or maps.
Here's a lesson on Occlusion...
Examples In Software:
- 3dsMax Base Package: mentalray "Ambient/Reflection Occlusion" map
- 3dsMax Plugins: Vray "VrayDirt" map
- Maya Base Package: mentalray mib_amb_occlusion
Advantages:
- Great for placing stuff like rust or dirt into the spots these things would naturally occur.
- Unlike Curvature, deals well with interpenetrating objects.
- The gradient isn't terribly useful as a pattern directly, has to be enhanced using some other method, like for example using Procedural Noise in XYZ Space.
- Not terribly intuitive to control.
- If rendered in realtime, can be slow to compute, if you decide to bake out the occlusion, you have to deal with a lot of extra files, and possibly applying good uvs to all your objects to bake to.
- If for animation, result must be baked so that you don't see dynamic occlusion. This requires you to deal with a lot of extra files, and possibly applying good uvs to all your objects to bake to.
Map that creates a gradient. Areas pointing in a particular direction get one color, areas pointing away get a second color, and a soft transition in between. This can be in camera space (so faces pointing towards the camera get 1 color, faces perpendicular to the camera get another color), or this can be in world space (all faces pointing up in Z get one color, all other faces get the second color.) You use the resulting gradient to mix between materials or maps.
Here's a lesson on direction...
Examples In Software:
- 3dsMax Base Package: Falloff Map set to "Perpendicular / Parallel
- Viewing Direction" or "Perpendicular / Parallel - World Z Axis", etc
Advantages:
- Useful for fresnel effects
- Useful for glowing energy effects
- Useful for dust / snow / wear that's landed on the up facing
surfaces
Disadvantages:
- The Gradient isn't terribly useful as a pattern directly, has to be enhanced using some other method, like for example using Procedural Noise in XYZ Space.
Map that creates a gradient. Areas inside a particular reference object is one color, outside is a second color, with controls for a soft transition (object can be Geometric, a special widget, even lighting). You use the resulting gradient to mix between materials or maps.
Examples In Software:
- 3dsMax Base Package: doesn't exist
- 3dsMax Plugins: Vray "VrayDistanceTex" map
- 3dsMax Plugins: Chameleon
Advantages:
- Specific placement of a feature using an easy to manipulate object in 3d space.
Disadvantages:
- The Gradient isn't terribly useful as a pattern directly, has to be enhanced using some other method, like for example using Procedural Noise in XYZ Space.
Map that creates a gradient. Areas that are a certain distance from an origin point get one color, areas near a second origin get a second color, and a soft transition in between. Origins can be a point object in space, a coordinate in world space, the distance from a camera, etc. You use the resulting gradient to mix between materials or maps.
Examples In Software:
- 3dsMax Base Package: Falloff Map set to "Distance Blend - Viewing
Direction" or "Distance Blend - World Z Axis", etc
Advantages:
- Useful if you want to fade colors on something as it gets further from the camera.
- Useful if you want everything above a certain height in your
scene
to receive some other material.
Disadvantages:
- The Gradient isn't terribly useful as a pattern directly, has to be enhanced using some other method, like for example using Procedural Noise in XYZ Space.
This site is ©2023 by Neil Blevins, All rights are reserved.


