All About Shadows By Neil Blevins Created On: Sept 17th 2025 Updated On: Nov 6th 2025 Software: Any
If you've ever taken a traditional art class, you may have heard terms
like Cast Shadow, Core Shadow, or Terminator. These terms are not only
useful in traditional art, but also for digital 2D and 3D art as well.
This lesson will go over all the different sorts of shadows and shadow
terminology, and how these concepts relate to each other and their real
world origins.
A Shadow Is A Shadow
First off, all shadows in the physical world are actually the same
thing, light not hitting a surface, which causes it to go dark. But
when making artwork, either in 2D or 3D, it's often easier to break
shadows into sub categories, and treat each one separately. But that
being said, always remember that any sort of shadow is the same
phenomena, a darkened area
where light has not struck an object, fundamentally they're all the
same regardless of how we go about
replicating them or categorizing them in our art.
Setup
1
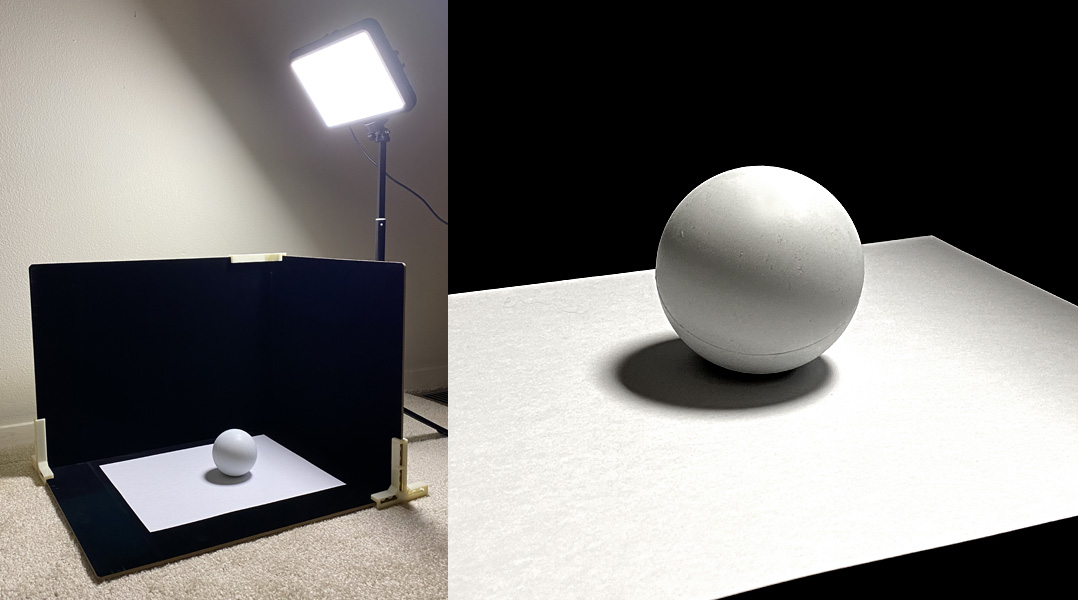
Let's start with a simple shadow example, a
white sphere sitting on a black table
with a single key light source.
Local Color
The subject of the scene is a round sphere. The sphere has
a Local Color, which is defined as the color of the material that makes
up the object in medium intensity white light. So if you have a banana,
it's local color would be yellow. This sphere's local color will be
white.
Note: we're assuming our sphere is made of a matte hard
material (like say wood or plastic). However, if your sphere is
something else, like human skin, or even a styrofoam sphere, you can
sometimes get some light that leaks into the surface. This is
due to Subsurface Scattering. You can read more about this phenomena
here: Translucency
and Sub-Surface
Scattering In The Real World In short, instead of light only
bouncing off a surface, some light enters the surface than bounces out
past the terminator line. So when observing shadows, keep in mind that
the object's material will also play in a part in the final placement
of the shadows.
Key Light
The key light hits the sphere, causing that area to be bright (To learn
more about Key Lights, visit 3 Point Lighting).
Where the
surface of the sphere is directly facing the light, you get maximum
brightness (modulated by the local color of the sphere). As the surface
starts to turn away from the direction of
the light, the sphere starts getting darker.
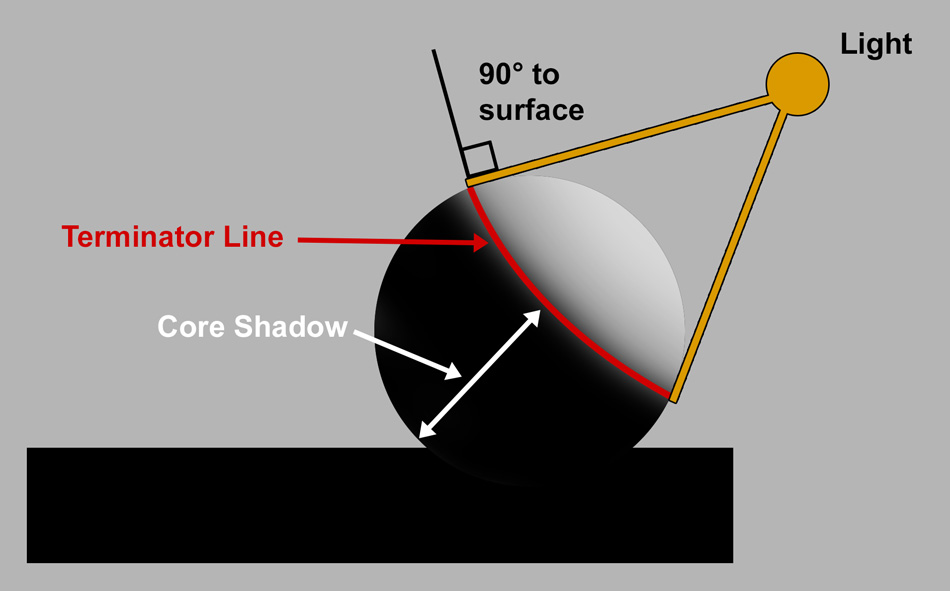
Terminator
At the point where the
surface is 90 degrees from the key light direction, you get the
Terminator
Line. The Terminator Line is where your Core Shadow starts in this
example.
Core Shadow
Since no light reaches the surface starting at the Terminator Line and
going past 90 degrees, that's the Core Shadow Area, which in this
example would be totally black.
Setup
2
So this example is similar, except we are using a white table under the
sphere.
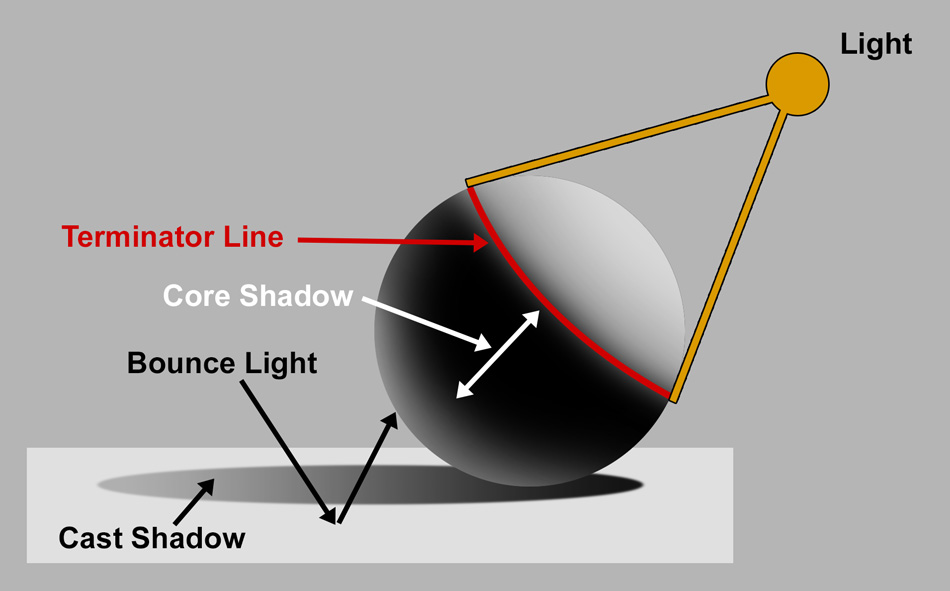
Doing so adds 2 new things to the equation: "Bounce Light" (also called
Reflected Light) and a "Cast Shadow".
Bounce Light
While the area of the sphere pointing away from the key light source
should
be fully dark, when the key light hits a white table instead of a black
table, the white table will "bounce light" towards the underside of the
sphere surface. The Local Color of the table will determine the color
of the
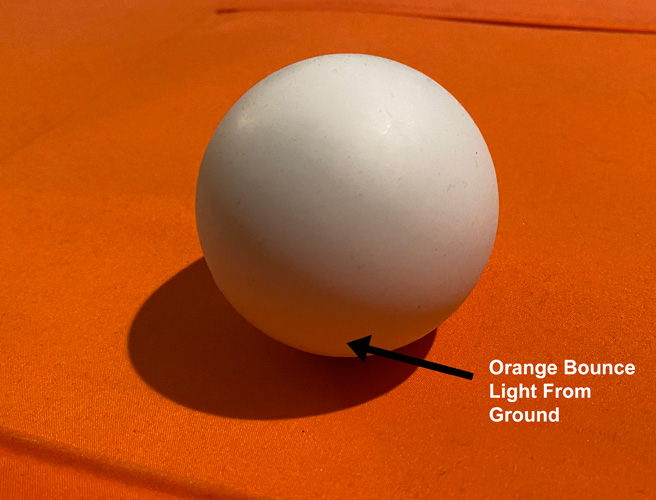
bounced light. In the diagram above, since the table is white, it will
just bounce white light. In the photo below, the bounce light is orange
due to the color of the surface the sphere is sitting on.
Notice the brightness of the bounce light isn't as bright as the key
light. This is due to the material it hits. If it hits a black table,
the black color absorbs all of the light energy from the key light,
and so no light bounces onto the underside of the sphere. If the table
is white, the table's surface will reflect the majority of the key
light
due to the local color of the table being white, but not all, some of
the light energy will be
absorbed. Hence the bounce light isn't as strong as the area being
directly hit by the key light.
The Terminator Line is at
the same spot as the previous example. But the Core Shadow Area is
now smaller because it's receiving some light from the bounce light.
The Core Shadow is always the darkest area of shadow on the subject.
On a side note, for those of you who use 3d software, bounce light is
one of the features that separates old school lighting from modern
raytracing. In the earlier days of computer graphics, rendering systems
couldn't simulate bounce light, and so your light source would create
direct lighting and core shadows only. People cheated bounce light by
placing low intensity lights in the shadow area, but the cheat didn't
always look terribly realistic. Years
later, when computers became faster, people started moving over to
raytrace renderers that could do a set of calculations called "Global
Illumination", which, among other things, could now properly simulate
bounce light accurately.
Cast Shadows
Now on to Cast
Shadows, which are shadows that one object projects onto another, or
onto itself. The
easiest example is when you're standing outside, the sun creates a cast
shadow of you standing there on the ground opposite of where the sun is.
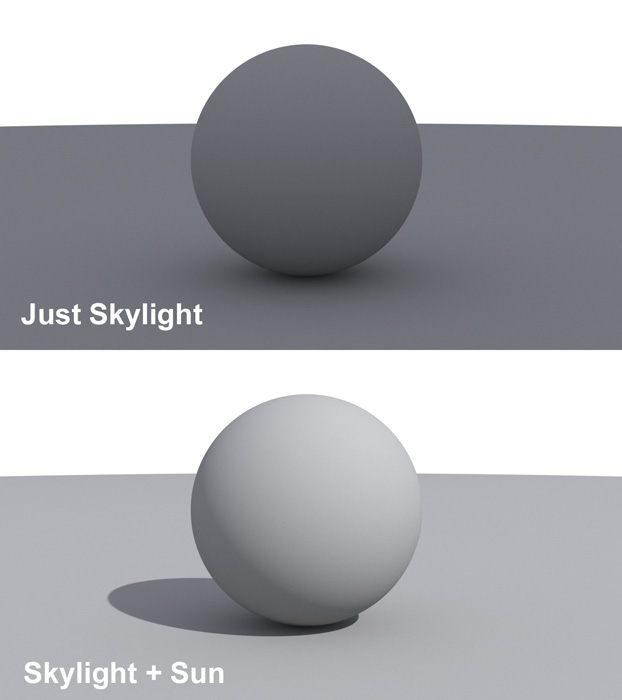
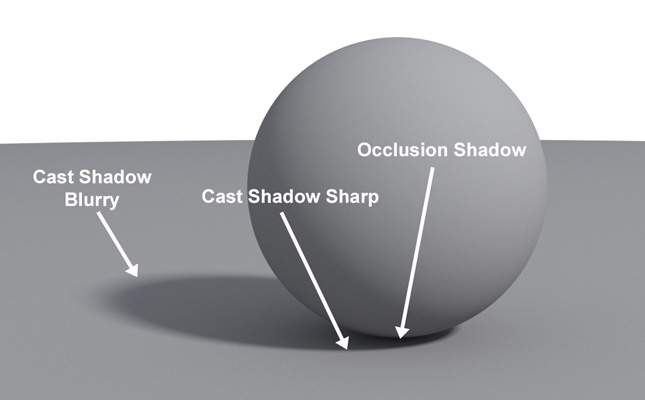
Cast Shadows with a Sky
(Occlusion)
You might notice a cast shadow can be darker closer to the object and
brighter further away. This is usually due to the sky (this can also
happen due to light bouncing around your room). The sky creates
a type of cast shadow called "occlusion", which is a soft blurry
darkening
under objects.
So in our outdoor example, the sky provides soft
illumination that also produces a soft shadow called occlusion. And the
sun provides strong direct light that also causes a much sharper cast
shadow. They combine together to form an area of darkness under your
subject that combines 2 shadows.
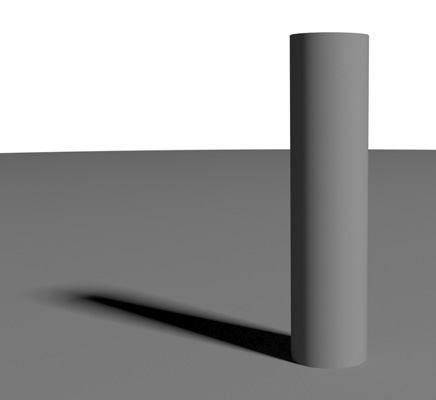
Cast Shadows Get Blurry The
Further They Cast
Another note on cast shadows is that when your light
source is really big (for example, the sun on a slightly hazy day), the
cast shadow gets blurry the further away it is from the object. Here's
a visual example of this, notice how the sunlight causes the shadow
near the cylinder to be sharp, and the shadow gets blurrier further
away.
So if you have a sun and a sky, you may get 2 shadows, the occlusion
and the standard cast shadow, and the cast shadow will go from sharp to
blurry the further it casts from the object.
This doesn't only happen with the sun, if you have a dark room with a
single light that's very large compared to the object it's
illuminating, you'll still get this same blurring of the cast shadow.
Shadows Are Not Always Blue
If you've done a traditional painting class, you may have heard the
rule that shadows should be blue, or "cool". This is sometimes true,
but not always. Let's explain what's actually happening.
So in the real world, a standard sky is usually a little blue. And the
sun is a little yellow. The sunlight has a direction, so if the sky was
black (ie, no atmosphere), but there was still a sun, you'd have cast
shadows and core shadows that were pure black, and anything facing the
sun is lit and slightly yellow. Now let's add in our blue sky. The sky
isn't directional like the sun, the sky because is 360 degrees around
you is providing illumination almost everywhere. So you have your sun
providing directional illumination, and sky providing ambient
illumination (for more on this, visit 3 Point Lighting).
So areas in sunlight are slightly yellow (which is a warm color), and
the shadow areas are slightly blue (or a cool color) because they are
receiving a little bit of light from the Blue sky.
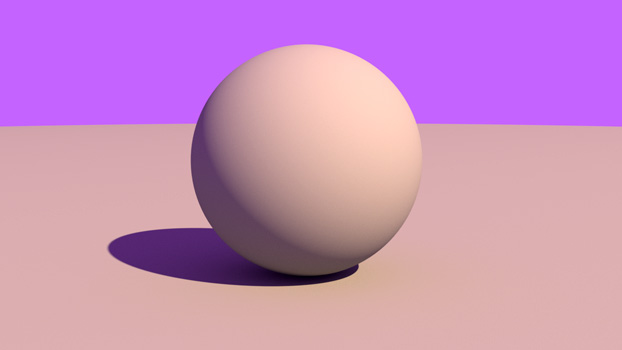
So assuming you have a blue sky and a yellow sun, you will get blue
shadows. But more accurately, the shadow color is tinted the color of
your ambient light, meaning the sky in an outdoor case. So if you have
a pink sky at sunset, your shadows should actually be tinted pink.
The same holds true for indoors, the shadows should be tinted the color
of the room's ambient light (which can come from bounce light instead
of a sky), so the shadows could be any color depending on what the
color of the room is.
Another reason some traditional artists suggest cool shadows and warm
light has nothing to do with reality, but is an artistic choice because
you want to introduce complimentary colors to draw the eye. And
something like orange and cyan are complimentary colors. This is a fine
artistic goal, but if you do this, note that this ia an artistic
choice, not a physical reality choice, so if your goal is to replicate
the real world, this may not be the rule for you.
2D and 3D
Now that you've learned the theory, you can use this knowledge to paint
light in 2D. Start by adding your core shadow on your subject (keeping
in mind any bounce light).
Then you can calculate your object's cast shadow on any surface it
hits, including potentially itself, assuming your subject is more
complex than a sphere. Like for example, an arm will have a cast shadow
that hits your body as well as hitting the ground.
Most 3d applications have a similar split, for example, in blender, if
you place a light source near a sphere, it will automatically calculate
the core shadow, but you have to check the "shadow" check box to have
it calculate a cast shadow.
Conclusion
Hopefully this helps explain some of these terms and how they interact
to create the lighting and shadow scenarios you see before you.